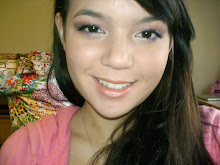
This is a wearable Valentine's Day look with pink, bronze and champagne shades. Below is a complete list of the exact products and brushes I used; they are not specified in the step-by-step written tutorial.
Products Used:
ELF Eyelid Primer
NYX Jumbo Eyeshadow Pencil - Strawberry Milk
Revlon Colorstay Lipstick - So Blushious
Revlon Illuminance Cream Shadow - Skinlights
Coastal Scents 88 Palette
Sally Girl Eyeshadow - Champagne
ELF Mineral Eyeliner - Coffee
Revlon Matte Shadow - Rich Sable
NYC Liquid Liner
Maybelline Great Lash BIG Mascara - Blackest Black
ELF Studio Line Blush - Candid Coral
ELF Healthy Glow Bronzing Powder - Luminance
Brushes Used:
Coastal Scents Synthetic Concealer Brush
Studio Tools Angled Brush
Coastal Scents Deluxe Eyeshadow Brush
ELF $1 Eyeshadow Brush
ELF $1 Blending Brush
ELF Studio Line Contour Brush
Coastal Scents Italian Badger Blending Brush
Coastal Scents Italian Badger Pencil Brush
Studio Tools Dual-Finish Brush
ELF Studio Line Blush Brush
Directions:
1) Begin with primed lids. Apply a pale, shimmery pink cream shadow to in the inner half of the lid and lower lash line, tracing around the tear duct. Do not apply too much, as cream shadows will crease when applied too heavily.
2) Apply a brighter pink cream shadow/lipstick to the outer half of the lid. Take a synthetic concealer brush (synthetic bristles will not "eat up" the product) and blend the cream shadows together.
3) Use a champagne-colored cream shadow to the brow bone as a highlight. Using an angled eyeliner brush, apply a light brown cream shadow to the outer half of the lower lash line.
4) Apply a light, matte peachy color from the crease to the brow bone with a fluffy brush. This will not add much color but will soften the crease colors we add later and make them more blendable.
5) Using a fluffy shader brush, pack a pale, matte pink onto the inner half of the lid over the light pink cream shadow.
6) Apply a slightly shimmery raspberry color to the outer half of the lid over the darker pink cream shadow with the same brush. Sweep the brush back and forth where the two pink shades join to make them to fade together.
7) Apply a bronze shade to the crease using a blending brush, focusing first on the outer half of the crease and then dragging the shadow gently to the rest of the crease.
8) Taking a smaller and denser crease brush, apply a slightly darker brown shade to the outer V. Trace the outer V till desired intensity is built; don't worry about harsh lines at this point.
9) Now take a clean fluffy blending brush and blend the colors together. Try to reserve blending to the crease, as we don't want to make the pink shades appear "muddy."
10) Once desired blending is achieved, apply a shimmery champagne shade with a fluffy brush to the brow bone as a highlight. With a pencil brush, apply the same color to the very inner corners of the eyes, around the tear duct, to bring focus and light to the eyes.
11) Apply the raspberry color from before to the middle of the lower lash line using a pencil brush. Then apply the darker brown shade from before to the outer part of the lower lash line, connecting it with the crease color.
12) Line the waterline and tightline with the chocolate brown shade. If desired, set with a matte brown powder to prolong the wear and intensify the color.
13) Apply a liquid liner with a very fine applicator to the upper lash line. A thin, precise line will keep the focus on the beautiful pink shades rather than on heavy liner.
14) Curl lashes and apply mascara of choice in the blackest color available for long, dramatic lashes.
15) Apply a coral-colored blush with gold reflects to the apples of the cheeks using a stippling brush (or brush of choice). Coral shades tend to flatter any skin tone and will keep the look from being overwhelmingly pink.
16) Optional: Highlight the face by sweeping a pearly highlight powder from the top of the cheekbones to the temples for a subtle, sun-kissed glow.
17) Apply a true pink shade to the lips to pull the look together and reiterate the Valentine's Day theme.
Enjoy!
Wednesday, February 3, 2010
Subscribe to:
Post Comments (Atom)

No comments:
Post a Comment